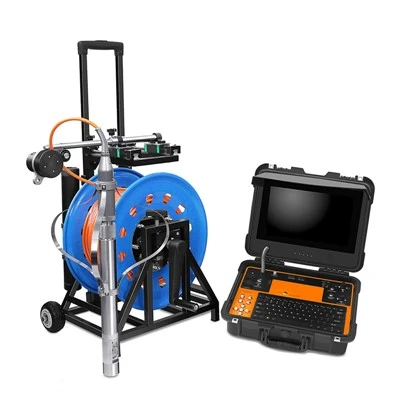
Installing a down hole camera is a technical process that requires careful planning and execution. As a leading Down Hole Camera supplier, we understand the importance of providing clear and detailed guidance to ensure a successful installation. In this blog, we'll walk you through the step - by - step process of installing a down hole camera, and also highlight some of our top - selling products that you might find useful.
Step 1: Pre - installation Preparation
Before you start the installation process, it's crucial to gather all the necessary tools and materials. You'll need a winch for lowering and raising the camera, cables long enough to reach the desired depth, a power source, and any necessary adaptors. Additionally, you should conduct a thorough inspection of the borehole. Check for any obstructions, such as rocks or debris, that could damage the camera during insertion. It's also essential to measure the depth and diameter of the borehole accurately. This information will help you select the appropriate camera model. For example, if you have a relatively narrow borehole, a smaller - diameter camera like our 33mm Pan Tilt Portable AHD Underwater Borehole Inspection Camera 50Mtr would be a great choice.
Step 2: Camera Selection
Choosing the right down hole camera for your specific needs is a key step. Consider factors such as the depth of the borehole, the environment inside the borehole (e.g., wet or dry), and the level of detail you require in the imaging. Our product range includes a variety of cameras to meet different requirements. The 45mm Rotation Portable Borehole Video Camera System 50Mtr is an excellent option for general - purpose borehole inspections. It offers a rotation function, which allows you to get a more comprehensive view of the borehole walls. If you're involved in drilling projects and need a camera specifically designed for drilling inspections, our Drilling Inspection Camera is the ideal choice. It provides high - resolution images and can withstand the rigors of the drilling environment.
Step 3: Cable Installation
Once you've selected the camera, the next step is to install the cable. Start by attaching the camera to the end of the cable securely. Make sure all the connections are tight to prevent any signal loss or water ingress. Then, carefully thread the cable through the winch mechanism. The winch should be set up in a stable position near the borehole opening. You may need to use additional guides or sheaves to ensure the cable feeds smoothly into the borehole. As you lower the cable, pay close attention to the tension. If the cable is too loose, it may get tangled, while excessive tension can damage the cable or the camera.
Step 4: Power Connection
Connect the power supply to the camera. Depending on the camera model, the power requirements may vary. Some cameras can be powered by a standard 12V battery, while others may require a more specialized power source. Make sure to follow the manufacturer's instructions regarding power connection. A proper power supply is essential for the camera to function correctly and provide clear images. You should also check the power cable for any signs of damage before making the connection.
Step 5: Camera Lowering
With the cable installed and the power connected, it's time to lower the camera into the borehole. Use the winch to lower the camera slowly and steadily. Keep an eye on the readout or monitor that shows the depth of the camera. If you encounter any resistance during the lowering process, stop immediately and investigate the cause. It could be due to an obstruction in the borehole or a problem with the cable. Once the camera reaches the desired depth, you can start the imaging process.
Step 6: Imaging and Adjustment
Most modern down hole cameras come with a monitor or a connected device that allows you to view the images in real - time. Adjust the camera settings, such as brightness, contrast, and focus, to get the best possible image quality. You may also need to adjust the camera's orientation or angle if it has a pan - tilt function. Ensure that you're capturing the areas of interest clearly. If you notice any areas that need further inspection, you can pause and zoom in on those areas.
Step 7: Retrieving the Camera
After you've completed the inspection, it's time to retrieve the camera. Use the winch to raise the camera slowly and carefully. Make sure to keep a steady hand to avoid any sudden movements that could damage the camera. Once the camera is out of the borehole, clean it thoroughly to remove any dirt or debris. You should also check the cable and connections for any signs of wear or damage.
Troubleshooting Tips
During the installation and operation process, you may encounter some common issues. If you're not getting a clear image on the monitor, check the power supply, the cable connections, and the camera settings. If the camera gets stuck in the borehole, don't try to force it out. Instead, try to identify the cause of the obstruction, such as a rock or a buildup of sediment. In some cases, you may need to use specialized equipment to remove the obstruction.
Guiding Contact for Purchase and Negotiation
If you're interested in purchasing a down hole camera for your project, we're here to help. Our team of experts can provide you with detailed product information, answer your questions, and assist you in selecting the right camera for your specific needs. We offer high - quality down hole cameras at competitive prices and provide excellent after - sales service. Whether you're a professional contractor, a geologist, or involved in any other field that requires borehole inspections, we have the perfect solution for you. Don't hesitate to reach out to us to start the negotiation process and get your project on the right track.


References
- Smith, J. (2020). Borehole Imaging Techniques. Journal of Geophysical Exploration, 15(3), 123 - 135.
- Johnson, T. (2019). Best Practices for Installing Down Hole Cameras. Drilling Industry Review, 22(2), 45 - 52.
- Brown, A. (2021). Advancements in Down Hole Camera Technology. Geotechnical Engineering Magazine, 18(4), 78 - 86.