For plumbers, completing sewer inspections efficiently and accurately is key to improving service quality and reducing construction costs. A reliable sewer inspection camera system acts like a powerful "X-ray tool" in your hands, helping you avoid blind excavation, quickly locate blockages, pipe cracks, root intrusions, and other issues, and making repair work far more efficient.
However, with so many products on the market ranging from a few hundred dollars to several thousand dollars, many plumbers struggle to choose the right system. What type should you choose? Which specifications really matter? How can you avoid wasting money on unnecessary features?
This guide will walk you through the entire process of choosing the best sewer inspection camera system. From camera types to key features, cable length, and camera head sizes, this article will help you select the right tool, improve job efficiency, and grow your plumbing business.
Introduction
Sewer blockages, aging pipes, and tree root intrusion are the most common plumbing problems in residential and commercial settings. In the past, plumbers could only rely on experience to guess the location of problems, which was not only inefficient but also prone to unnecessary digging due to misjudgment, increasing customer costs and damaging their own reputation. However, with the development of technology, the emergence of sewer inspection camera systems has completely changed this situation. Using waterproof cameras and flexible cables, these systems penetrate deep into pipes, transmitting real-time images that clearly show every detail inside the pipes, achieving "tear-free inspection" and significantly improving inspection accuracy and work efficiency.
However, the market currently offers a wide variety of sewer inspection camera systems from various brands and models, with prices ranging from $200 to $4,000, and significant differences in functionality: some are suitable for small residential pipe inspections, while others are adapted to large municipal pipelines; some have automatic leveling functions, while others require manual angle adjustment. For plumbers, choosing the right system can not only save on initial investment but also improve work efficiency and reduce maintenance costs in the long run. This article will provide a comprehensive and practical selection guide, covering topics such as "What is a Sewer Inspection Camera?", "Camera Types", "Key Selection Points", and "Price Range", helping you avoid common purchasing mistakes and find the most suitable product for your work scenario.
What Is a Sewer Inspection Camera?
A sewer inspection camera is a specialized device designed to inspect the inside of pipelines. It allows plumbers to view the interior of underground pipes, drains, and sewer lines in real time.
The system works by sending a waterproof camera head attached to a flexible cable into the pipe. The live video feed is transmitted to a monitor, enabling plumbers to identify issues such as:
- Pipe blockages
- Cracks or breaks
- Corrosion
- Root intrusion
- Pipe misalignment
- Collapsed sections
A typical sewer inspection camera system includes four main components:
1. Camera Head
The camera head is waterproof, corrosion-resistant, and impact-resistant. Most models include LED lights to illuminate the dark interior of pipes.
2. Push Cable
The flexible cable connects the camera to the control unit and allows the camera to navigate through pipe bends.
3. Control Unit
Usually equipped with a monitor, the control unit displays live footage. Many systems also support video recording and image capture.
4. Cable Reel
The cable reel stores the cable and makes transportation easier. Some cable reels include meter counters to measure how far the camera has traveled inside the pipe.
Compared to traditional methods, sewer inspection cameras offer major advantages:
- No excavation required
- More accurate diagnostics
- Faster inspection process
- Lower repair costs
For modern plumbers, sewer cameras have become an essential tool.
Types of Sewer Cameras
Based on work scenarios, pipe size, and functional requirements, sewer inspection cameras on the market can generally be divided into four main types.
Each type is designed for different inspection tasks. Plumbers should choose the most suitable system based on the types of projects they handle-residential, commercial, or municipal-to avoid purchasing equipment with either insufficient or unnecessary features.
1. Push Cameras
Push cameras are the most common and basic type of sewer inspection camera. They are the preferred choice for most plumbers, especially for residential and small commercial inspections.
The key feature of this system is the fiberglass push rod cable, which allows the operator to manually push the camera through the pipe. These cameras are typically designed for smaller pipelines (2–6 inches in diameter) and short to medium inspection distances (100–200 feet).
Advantages
- Affordable price, usually between $500 and $1000
- Compact and lightweight design
- Easy to transport between job sites
- Simple operation with minimal training required
Push cameras are ideal for inspecting:
- Residential drain pipes
- Kitchen sewer lines
- Bathroom plumbing systems
They can quickly identify common issues such as blockages, hair buildup, grease accumulation, and small pipe cracks.
Limitations
Push cameras are not ideal for large pipelines or long-distance inspections. Since the camera must be manually pushed through the pipe, inspections can require significant physical effort, especially in pipelines with multiple branches or steep slopes.
2. Pan and Tilt Cameras
Pan and tilt sewer cameras are designed with a camera head that can rotate horizontally and vertically. This allows operators to control the viewing angle and inspect the pipe interior from multiple directions.
The camera head can typically rotate 360° horizontally and tilt 180° vertically, enabling full coverage inspection without blind spots.
Advantages
- Wide inspection coverage
- Ability to examine pipe walls in detail
Ideal for detecting hidden problems such as:
- Pipe joint cracks
- Sidewall damage
- Tree root intrusion
These cameras are particularly useful for commercial pipelines and small municipal sewer systems, where pipe structures are more complex.
Some advanced models also provide high-definition video recording, allowing plumbers to document inspections and present clear reports to customers.
Limitations
Pan and tilt systems are more expensive than push cameras, typically ranging from $1000 to $1500.
They are also slightly larger and heavier, making them less portable. Additionally, operating the pan-tilt mechanism may require some experience and training.
3. Self-Leveling Cameras
Self-leveling sewer cameras are an upgraded version of push cameras or pan-tilt systems. The camera head contains an internal mechanism that automatically keeps the image horizontally aligned.
No matter how the pipe bends or tilts, the camera automatically maintains an upright video orientation, eliminating the need for manual adjustments.
Advantages
- Easy and convenient operation
- Reduced need to manually rotate the cable
- Stable and upright video footage
- Improved readability of inspection images
These systems are especially useful for long pipelines or pipelines with multiple bends.
Self-leveling cameras are also helpful for beginner plumbers, as they reduce the risk of misinterpreting inspection footage caused by rotated images. Additionally, upright footage is easier to show and explain to customers.
Self-leveling functionality usually increases the price by about $100–$300 compared to standard camera systems, making it a cost-effective upgrade for professionals performing frequent inspections.
Limitations
Because of the additional internal mechanism, self-leveling cameras have a more complex structure. They are also not designed for inspections that require camera rotation, where a pan-tilt system would be more suitable.
4. Crawler Cameras
Crawler cameras are designed for large pipelines and long-distance inspections. Unlike push cameras, these systems include a motorized crawler unit that moves through the pipeline automatically.
This allows the camera to travel long distances without requiring manual pushing.
Crawler cameras are typically used in pipelines with diameters larger than 8 inches and for inspection distances exceeding 200 feet.
Advantages
- Self-propelled movement inside pipelines
- Reduced physical effort for operators
- Suitable for long-distance inspections
Capable of handling complex environments such as:
- Steep pipelines
- Debris-filled sewer systems
Some crawler camera systems also include GPS positioning and distance measurement functions, allowing technicians to accurately record the inspection location and pipeline length.
Limitations
Crawler systems are significantly more expensive, often costing over $8000.
They are also larger, heavier, and more difficult to transport, and require professional training to operate.
For this reason, crawler cameras are typically used by municipal inspection teams, infrastructure contractors, or large pipeline maintenance companies, rather than independent plumbers.
Key Features to Consider When Choosing a Sewer Inspection Camera
When selecting a sewer inspection camera system, identifying the correct type is only the first step. The core features of the system are what truly determine inspection efficiency, accuracy, and equipment durability.
For plumbers and pipeline inspection professionals, the following five key features should be carefully evaluated. Focusing only on price while ignoring functionality can lead to equipment that does not meet real working needs.
1. Camera Resolution and Image Quality
Camera resolution is the primary factor that determines image clarity. It directly affects whether inspectors can accurately identify small issues inside pipelines, such as:
- Fine cracks
- Hair or grease buildup
- Pipe corrosion
- Minor blockages
It is recommended to choose a camera with a resolution of at least 720P, while 1080P HD cameras are preferred for professional inspections.
High-definition images allow plumbers to clearly observe every detail of the pipe interior, reducing the risk of misdiagnosis caused by blurry footage. HD systems also make it easier to record videos or capture images, which can be shared with customers to clearly demonstrate the problem and increase service professionalism.
Waterproof Rating
Another critical factor is the waterproof level of the camera head. A rating of IP68 is recommended, as it allows the camera to operate underwater for extended periods while offering protection against corrosion and impact.
LED Lighting
Many camera heads include 6–12 adjustable LED lights, which provide illumination inside dark pipelines. Adjustable brightness allows inspectors to obtain clear images even in completely dark sewer environments.
2. Cable Quality and Durability
The cable is the core connection between the camera head and the control unit. During inspections, the cable constantly experiences friction, pulling, and bending inside pipelines. Poor-quality cables may wear out or break over time.
To ensure durability, it is recommended to choose cables made with fiberglass reinforcement.
Benefits of Reinforced Cables
- High flexibility for navigating pipe bends
- Excellent wear resistance
- Strong tensile strength
- Longer service life
The outer layer of the cable should also be corrosion-resistant and waterproof, ideally using coaxial fiberglass materials that can withstand sewage, chemicals, and harsh pipeline environments.
Cable Length Marking
Some inspection systems include meter counters, allowing plumbers to track how far the camera has traveled inside the pipe. This helps locate problem areas more accurately, improving inspection efficiency.
3. Control Unit and Ease of Operation
The control unit is the central component used to operate the sewer inspection system. Choosing a model with a clear and easy-to-use interface can significantly improve inspection efficiency.
It is recommended to select a system equipped with an 8–13 inch HD monitor.
Benefits of Larger Screens
- Easier to view small pipe defects
- Better visibility during outdoor inspections
- Improved readability under strong sunlight
- Some professional monitors also offer sunlight-readable displays, which are ideal for outdoor service work.
Recording and Storage
Many sewer inspection cameras support:
- Video recording
- Photo capture
- SD card storage
A system that includes 16–32GB SD card storage allows plumbers to save inspection footage for later analysis or customer reporting.
The ability to transfer data to a computer is also useful for generating inspection reports for clients.
Ease of Use
The system should feature simple buttons and intuitive controls, especially for beginners. Complex operating procedures may slow down inspection work.
Some advanced models also support wireless control, allowing operators to adjust camera angles or LED brightness remotely.
Battery Life
Battery capacity is another important consideration. It is recommended to choose a system with at least 6 hours of operating time.
Rechargeable lithium batteries are preferred because they provide stable power and can be reused for long-term field work.
4. Locator Function (Sonde / Locator)
For plumbers who need to locate pipe problems-especially in underground pipelines-a locator function is extremely valuable.
Many professional sewer cameras include a 512Hz built-in sonde transmitter inside the camera head.
Using a locator receiver, technicians can detect the signal and determine:
- The exact location of the camera underground
- The depth of the pipeline
- The position of the blockage or damage
This technology prevents unnecessary digging and significantly reduces repair costs.
Recommended Features
A switchable sonde transmitter to conserve battery when not needed
Stable signal transmission for deep pipelines
A meter counter that shows how far the camera has traveled inside the pipe
These features greatly improve diagnostic accuracy and repair efficiency.
5. Portability and Storage Design
Plumbers often transport equipment between job sites, so portability and storage design are very important.
It is recommended to choose systems that include:
- Portable carrying cases
- Cable reel systems
- Compact storage designs
A cable reel helps keep the push rod organized and protected, preventing tangling or unnecessary wear.
Cable Length Guide for Sewer Inspection Cameras
The cable length is one of the most important parameters when choosing a sewer inspection camera system. It directly determines the inspection range and the types of jobs the system can handle.
Selecting the wrong cable length may lead to two common issues:
If the cable is too short, the inspection cannot be completed.
If the cable is too long, it may increase equipment weight, cost, and operational difficulty without adding real value.
To achieve the best balance between performance, portability, and cost, plumbers should choose cable length based on their most common work scenarios. Below are recommended cable lengths for typical applications.
1. Small Residential Applications
Recommended Cable Length: 100–150 ft (30–45 m)
This scenario typically includes inspections of:
- Kitchen drain pipes
- Bathroom drainage systems
- Balcony drainage pipes
- Small household pipelines
Most residential drain pipes are usually 50–100 feet long, so a 100–150 ft cable is more than sufficient.
Advantages
- Lightweight and compact equipment
- Easy to transport for service calls
- Flexible operation inside small pipelines
- Lower equipment cost
This cable length is ideal for independent plumbers performing daily residential inspections.
Typical equipment with this configuration usually falls within the $500–$1500 price range, offering excellent value without unnecessary cable length.
2. Medium Residential or Small Commercial Applications
Recommended Cable Length: 150–196 ft (45–60 m)
These inspection tasks typically involve:
- Residential main sewer lines
- Drainage systems in small commercial buildings
- Pipes in convenience stores, restaurants, or small offices
Pipeline lengths in these environments are often 100–200 feet, so a cable length of 150–196 ft (45–60 m) is recommended.
Advantages
- Covers most medium-distance inspections
- Still relatively portable and easy to operate
- Suitable for plumbers who regularly handle small commercial projects
Sewer inspection cameras in this category typically range from $1000 to $2800, offering a strong balance between capability and portability.
3. Large Commercial or Small Municipal Applications
Recommended Cable Length: 196–493 ft (60–150 m)
This category includes inspections of:
- Main pipelines in large commercial buildings
- Hotel or shopping mall drainage systems
- Small municipal sewer networks
Pipelines in these environments may reach 200–250 feet or more, so a cable length of 250–300 ft or longer is recommended.
Advantages
- Suitable for long-distance inspections
- Often combined with self-leveling or pan-tilt camera systems
- Designed for professional inspection tasks
These systems are commonly used by professional plumbing contractors or pipeline inspection companies, with equipment prices typically ranging from $2800 to $3200.
When selecting longer cables, it is important to prioritize reinforced or heavy-duty cable materials to ensure durability and reduce wear during extended use.
Additional Tips for Choosing the Right Cable Length
When selecting a sewer inspection camera, remember that a longer cable is not always better.
Avoid Excessively Long Cables
Very long cables may:
- Increase equipment weight
- Make the operation more difficult
- Raise the overall equipment cost
Consider Expandable Cable Systems
If long-distance inspections are only occasionally required, it may be better to choose a system that supports cable extensions rather than purchasing an overly long cable initially.
This approach helps plumbers reduce unnecessary investment while maintaining flexibility for future projects.
Choosing the correct cable length ensures that your sewer inspection camera system remains efficient, portable, and cost-effective, allowing plumbers to handle a wide range of inspection tasks with confidence.
Camera Head Size Guide for Sewer Inspection Cameras
The camera head size (diameter) plays a crucial role in determining whether a sewer inspection camera can enter and effectively inspect different pipe sizes.
Choosing the wrong camera head size may lead to two common problems:
If the camera head is too large, it may not fit into the pipe.
If the camera head is too small, the image may become unstable and the inspection accuracy may decrease.
For best performance, plumbers should select the camera head diameter based on the pipe size they inspect most frequently. Below is a practical guide to help you choose the right camera head size for different pipeline diameters.
1. Small Pipes (1–2 Inches / 25–50 mm)
Small pipes typically include:
- Kitchen sink drain pipes
- Bathroom floor drains
- Toilet connection pipes
For these narrow pipelines, it is recommended to use a micro camera head with a diameter of 0.35–0.5 inches (9–13 mm).
Advantages
- Compact size allows the camera to easily enter tight spaces
- Compatible with small push rod inspection cameras
- Flexible movement through narrow pipes
- Clear image quality for residential plumbing inspections
These cameras are ideal for routine household drain inspections, where pipe diameter is limited, and flexibility is essential.
2. Medium Pipes (2–6 Inches / 50–150 mm)
Medium-sized pipelines are the most common inspection targets for plumbers. These include:
- Residential main sewer lines
- Drainage pipes in small commercial buildings
- Balcony and outdoor drainage systems
For these pipelines, a camera head diameter of 0.7–1.0 inches (18–25 mm) is recommended.
Advantages
- Balanced flexibility and image quality
- Compatible with both push rod cameras and self-leveling camera systems
- Capable of capturing clear pipeline details
- Able to pass through pipe bends smoothly
This size range covers most daily plumbing inspection needs.
3. Large Pipes (6–12 Inches / 150–300 mm)
Large pipelines are typically found in:
- Commercial drainage systems
- Industrial facilities
- Small municipal sewer networks
For these applications, it is recommended to use a camera head diameter of 1.0–2 inches (25–50 mm).
Advantages
- Larger camera sensors provide better image quality
- Often compatible with pan-tilt or self-leveling camera systems
- Durable design suitable for large pipeline environments
- Stronger resistance to impact and harsh conditions
These camera systems are commonly used in professional sewer inspection equipment priced between $1800 and $3000.
When selecting larger camera heads, it is important to ensure compatibility with the push rod cable system to maintain stable operation during inspections.
Additional Tips for Choosing the Right Camera Head
When selecting a sewer inspection camera head, plumbers should consider more than just size.
Camera Head Material
It is recommended to choose stainless steel camera heads, which offer:
- Strong corrosion resistance
- Better impact resistance
- Longer service life in harsh pipeline environments
Lens Viewing Angle
A wide-angle lens of 120°–130° or 360° is ideal for sewer inspection cameras because it:
- Expands the field of view
- Helps detect cracks, blockages, and pipe damage
- Reduces the risk of missing important details
Selecting the correct camera head size, material, and lens angle will greatly improve inspection efficiency and accuracy.
For plumbers and pipeline inspection professionals, choosing the right configuration ensures better performance, clearer images, and more reliable diagnostics during sewer inspections.
Self-Leveling VS Standard Camera
When choosing a sewer inspection camera system, many plumbers often hesitate between a self-leveling camera and a standard camera.
The core difference lies in whether the camera head has an automatic leveling function, which determines how well the system adapts to different inspection environments.
Below is a detailed comparison to help you make the right choice.
1. Standard Camera
A standard camera does not have a self-leveling feature. The camera head maintains a fixed orientation, so when the pipe bends or tilts, the transmitted image may rotate or appear upside down. Operators often need to manually adjust the cable angle to obtain an upright image.
Advantages
-
Simple structure with a lower failure rate
- Lower maintenance cost
- Ideal for small residential pipe inspections where pipes have fewer bends and shorter inspection distances
- Easy to operate, making it suitable for beginner plumbers or independent plumbers with limited budgets
- Meets the needs of basic daily inspection tasks
Limitations
-
Lower operating efficiency, as manual adjustments are often required
- In long or complex pipelines, operators may experience fatigue from frequent adjustments
- Images may appear tilted or upside down, affecting inspection accuracy
- Less convenient when showing inspection results to customers
- Not ideal for long-distance or complex pipe inspections
2. Self-Leveling Camera
A self-leveling camera features a built-in liquid leveling sensor inside the camera head. Regardless of how the pipe bends or tilts, the camera automatically keeps the image horizontally aligned, ensuring the video remains upright at all times.
This makes it an upgraded version of the standard camera.
Advantages
- Higher operating efficiency with no need for manual angle adjustments
- Particularly suitable for long-distance inspections and pipelines with multiple bends
- Stable and upright image, improving inspection accuracy
- Easier to explain inspection results to customers
- Enhances the professional appearance of plumbing services
- Ideal for commercial jobs and complex pipeline systems
Limitations
- Higher price, usually $100–$200 more than a standard camera with similar configuration
- More complex structure with slightly higher maintenance costs
- For small residential jobs, some features may be unnecessary
Recommendation
If your main work involves small residential pipe inspections, with a limited budget ($500–$1000) and relatively simple pipelines, a standard camera is usually sufficient and offers better cost performance.
However, if you frequently handle commercial projects, long inspection distances, or pipelines with multiple bends-and your budget is around $1000–$2000-a self-leveling camera is highly recommended. It significantly improves efficiency and inspection accuracy, making it a better long-term investment.
Best Sewer Cameras for Plumbers
Based on the comparison above, here are three cost-effective sewer inspection camera systems recommended for plumbers. These models cover a price range of $500–$3000 and are suitable for different working scenarios.
1. Best Entry-Level Choice
Bestder 100ft / 30m Sewer Inspection Camera (Approx. $900)
Key Features
✅2MP camera
✅IP68 waterproof rating
✅100 ft (30 m) fiberglass push cable
✅8-inch HD monitor
✅9 adjustable LED lights
✅DVR recording function
✅16GB SD card
✅6800mAh lithium battery (up to 6 hours of operation)
✅Stainless steel camera head (20mm diameter)
Advantages
- Affordable price with reliable performance
- Suitable cable length for medium residential and small commercial jobs
- Durable IP68 waterproof design for harsh pipeline environments
- LED lighting ensures visibility in dark pipes
- Supports video recording and image capture for reporting to customers
- Compact and easy to carry
Suitable Applications
- Small residential pipelines
- Medium residential plumbing systems
- Small commercial pipe inspections
Compatible with 2–6 inch pipelines, covering most daily inspection needs.
2. Best Value Choice
Bestder 100ft / 30m Pan-Tilt Camera with Locator (Approx. $2380)
Key Features
✅2MP Full HD camera
✅IP68 waterproof rating
✅100 ft (30 m) fiberglass push cable
✅8-inch LCD monitor
✅360° horizontal rotation and 180° vertical tilt
✅512Hz locator
✅4 adjustable LED lights
✅DVR recording
✅32GB SD card
✅Up to 8 hours of battery life
✅Stainless steel camera head (33mm diameter)
Advantages
- Clear 1080P HD imaging
- Pan-tilt functionality for easier inspection
- 512Hz locator helps pinpoint underground pipe problems
- Ideal for inspections requiring accurate location detection
- Supports recording and data storage for reporting
Suitable Applications
- Medium residential inspections
- Small commercial plumbing projects
- Pipelines with multiple bends and moderate inspection distances
3. Professional Choice
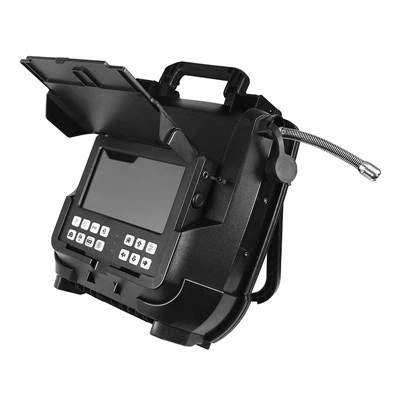
Bestder 150m Sewer Inspection Camera with 13-inch Control Monitor (Approx. $3300)
Key Features
✅1080P HD camera
✅IP68 waterproof rating
✅492 ft (150 m) fiberglass push rod cable
✅13-inch control monitor
✅360° pan-tilt camera
✅512Hz locator
✅6 adjustable LED lights
✅DVR recording
✅Wireless keyboard
✅8000mAh rechargeable lithium battery (8 hours runtime)
✅Stainless steel camera head (50mm diameter)
Advantages
- Full professional inspection capability
- Pan-tilt camera eliminates blind spots
- Long push cable for deep and complex pipeline inspections
- Accurate locator system
- Wireless control for improved flexibility
- Long battery life for field work
Suitable Applications
- Large commercial projects
- Small municipal pipeline inspections
- Plumbing contractors handling complex inspection jobs
Conclusion
Choosing the best sewer inspection camera depends on your specific job requirements. There is no need to blindly pursue high-end features, but it is also important not to choose equipment that lacks the necessary capabilities.
Plumbers should first determine:
- Inspection scenario (residential, commercial, municipal)
- Pipe diameter
- Inspection distance
- Budget
Then focus on key specifications such as:
- Camera resolution
- Cable quality
- Ease of operation
- Locator functionality
Quick Summary
- Beginner plumbers ($500–$1000): Entry-level push rod cameras are sufficient for residential inspections.
- Experienced plumbers ($1000–$2000): Self-leveling or pan-tilt cameras improve efficiency for commercial work.
- Professional contractors ($2000–$3000): Advanced systems with self-leveling and pan-tilt cameras offer the best performance for complex inspections.
A reliable sewer inspection camera not only saves time and reduces costs, but also enhances your professionalism and helps build customer trust.
If you are still unsure which sewer camera suits your requirements, consider your typical job types (residential or commercial) and your budget. You can also consult our experts via email: info@bestdertech.com for a more precise recommendation.